What Goes Into a Residential Booth Seating Section Drawing
Learn which measurements and assembly details a residential booth section drawing should identify before fabrication.
What Goes Into a Residential Booth Seating Section Drawing
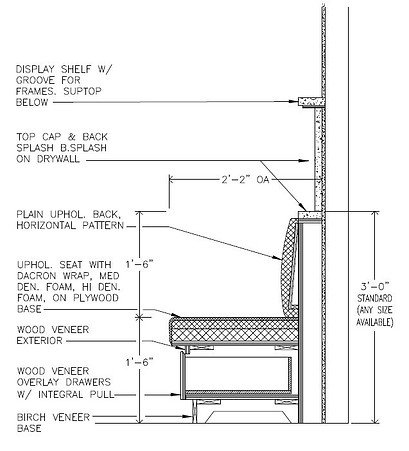
A residential booth seating section drawing is a vertical cut through the proposed bench, backrest, and nearby table. It answers questions that a mood board or floor plan cannot: where the finished cushion ends, how the back meets the seat, what happens at the base, and how people sit relative to the tabletop. This is a documentation checklist, not a substitute for a licensed design or engineered construction drawing.
Know what each drawing view communicates
A plan view looks down on the room and shows booth length, table location, wall conditions, and circulation. An elevation looks straight at a wall or front face and helps communicate backrest height, panel seams, and visible detailing. A section slices through the assembly to show depths, heights, cushions, frame, and the table relationship.
Use all three views for a custom built-in. A section on its own cannot explain whether the booth blocks a door, whether the table can move, or whether the bench fits between two walls. Label the views consistently so the installer knows exactly which face and seating run each detail represents.
Mark finished seat height and usable depth
The drawing should distinguish the structural platform from the finished sitting surface. Foam, padding, upholstery, and compression all affect where a person actually sits. A seat height around 18 inches and a usable depth around 18–20 inches are common starting points for dining, not universal build specifications. Record the chosen finished dimensions after evaluating users and the table.
Seat depth should be measured to the face of the finished back cushion rather than to the bare wall framing. Similarly, show the position of any angled back so the seating area does not become unexpectedly shallow. A small dimensional discrepancy at the mock-up stage is far easier to correct than after fabrication.
Draw the backrest and cushion build-up
Label the backrest's overall height from finished floor and show the intended recline, cushion thickness, seams, and upholstery edges. If a full-height back meets a window sill or trim, show that intersection on the elevation too. Note whether the back pad is removable, accessible from above, or permanently fixed.
Avoid vague notes such as 'comfortable back angle' without a dimension or approved sample. An upholsterer may interpret the instruction differently from the cabinetmaker. A physical mock-up, even with temporary foam, can resolve expectations about reach and posture before the full unit is built.
Show the base, toe recess, and attachment logic
The section should describe the front plinth, any toe or foot recess, the position of legs or supports, and the space left for cleaning. If a storage lid or drawer is included, indicate where it moves and whether the dining table interferes with access. Hidden storage that cannot be opened when the table is in place is a frequent planning mistake.
Specify which assemblies are to be mechanically secured, but do not copy unverified fixing sizes or screw schedules into a generic article. Wall construction, loads, anchorage, and moisture conditions vary. A carpenter or appropriate designer must assess the actual installation and detail safe attachment for that project.
Include the table and circulation in the section
Draw a line for the finished table surface, the tabletop thickness, the nearest apron or underside obstruction, and the position of its base. This helps reveal poor knee room that is not visible from the tabletop footprint alone. Use the paired plan view to check that people can enter from the open end and that paths remain usable when others are seated.
If the project involves a space subject to accessibility requirements, a residential mock-up is not evidence of compliance. For example, ADA rules for covered dining facilities have defined requirements for accessible dining surfaces and knee and toe space. Whether those rules apply depends on the actual building and use; seek the appropriate local professional review rather than treating this article as a code schedule.
Review the drawing with the fabricator
Before construction, ask the shop to confirm every dimension that affects a neighboring trade: seat frame, upholstery build-up, electrical access, table base, wall backing, trim, and floor finish. Decide who owns the final measurements and who is responsible for updating the drawing if site conditions differ.
A useful final drawing set includes a scale and revision date, clear dimensions, material descriptions, a section reference on the plan, and notes distinguishing intended finished surfaces from structural components. The best section drawing prevents surprises by making assumptions visible to everyone involved.
Related planning guides
Continue with booth seating layouts and access.