How to Make Dog Kennel Furniture
Step‑by‑step instructions for building custom dog kennel furniture, including material lists, tools, and design ideas.
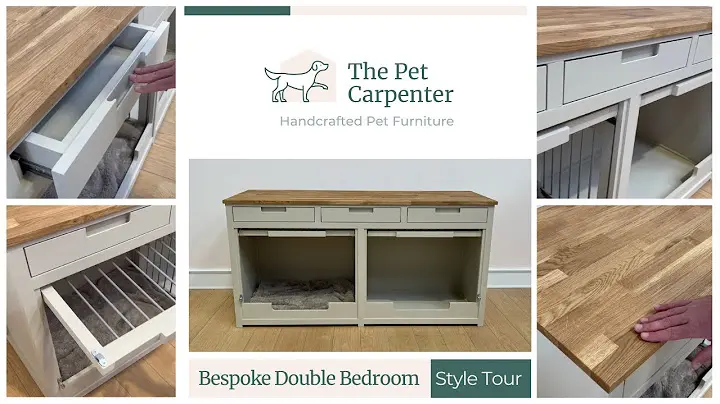
Building a dog kennel that feels like a cozy home is a rewarding project for any pet owner who loves hands‑on work. This guide walks you through the essential materials, tools, and step‑by‑step construction process for a custom dog kennel that balances durability, comfort, and style. By following these instructions, you’ll create a safe, functional space that your dog will love and that fits your décor.
Materials & Tools Needed
The foundation of a sturdy dog kennel starts with quality lumber. Choose 2‑inch thick, kiln‑dried pine or cedar for the frame; these woods resist warping and offer natural rot resistance. For the walls, use 1‑inch thick plywood or medium‑density fiberboard (MDF) to provide a smooth surface for paint or stain. A 3‑inch thick, 4‑by‑4 lumber is ideal for the base and support posts, ensuring the kennel can handle a medium‑sized dog’s weight.
Finish the interior with a non‑toxic, pet‑safe paint or a clear polyurethane sealant to protect against chewing and moisture. Add a removable, washable bedding pad for comfort. For the door, a 1‑inch thick plywood panel with a simple latch or magnetic catch will allow easy access while keeping the dog secure. If you prefer a lofted design, incorporate a 2‑inch thick plywood platform at the top, supported by 2‑inch studs spaced 16 inches apart.
Tools are essential for precision and safety. A circular saw or table saw cuts the lumber to exact dimensions; a miter saw helps with angled cuts for corners. A power drill with a 3/8‑inch drill bit creates pilot holes for screws, while a 1‑inch wood screw set fastens the frame. A measuring tape, square, and level ensure accurate alignment. A staple gun can secure the bedding, and a sanding block or orbital sander smooths rough edges before finishing. Finally, a spray gun or brush applies paint or sealant evenly, reducing brush marks and providing a professional look.
Design Plans & Measurements
Begin by sketching a simple rectangular layout that accommodates your dog’s height and length. For a medium‑sized dog, a 4‑by‑6 foot footprint with a 2‑by‑2 foot loft offers ample space. Measure the dog’s height from the ground to the top of the head; add 12 inches for headroom and 6 inches for bedding. The kennel’s width should be at least 1.5 times the dog’s shoulder width to prevent crowding.
Mark the base frame on the floor with chalk or a tape measure, then cut the 4‑by‑4 posts to the desired height—typically 3 feet for the walls and 4 feet for the loft support. Attach the posts to the base using 2‑inch screws and a wood glue joint for added strength. Frame the walls with 2‑inch lumber, ensuring each corner is a 90‑degree angle using a carpenter’s square. The plywood panels fit snugly between the frame, leaving a 1/8‑inch gap for expansion and ventilation.
Install the door by cutting a 2‑by‑3 foot opening in one wall. Attach a 1‑inch plywood panel with a latch; the latch should be positioned 6 inches from the floor to keep the dog from slipping out. For the loft, cut a 2‑by‑2 foot plywood platform and secure it to the top of the frame with 1‑inch screws, spacing the support studs 16 inches apart. Finally, sand all surfaces, apply paint or sealant, and place a soft bedding pad inside. The finished kennel will be a durable, stylish addition to your home that offers your dog a safe retreat.
Step‑by‑Step Build Process
The first step in creating a custom dog kennel furniture piece is to select a sturdy base that matches the size of your pet. A common choice is a 4‑by‑4‑foot plywood panel, ¾‑inch thick, which provides a solid foundation for the walls and floor. Cut the panel to the desired dimensions using a circular saw, then sand the edges with 120‑grit sandpaper to remove splinters. Next, construct the walls by attaching 2‑by‑4 lumber to the base with wood screws. Space the studs 16 inches apart to ensure structural integrity. Use a drill to pre‑drill screw holes, preventing the wood from splitting. Once the frame is assembled, attach a sheet of plywood or particleboard to each wall, securing it with screws and wood glue for added stability. The floor panel should be cut to fit snugly within the frame; a small lip around the perimeter helps keep bedding in place. After the frame is complete, install a hinged door by attaching a 1‑by‑4 piece of plywood to the frame with a hinge and a latch. The door should open fully without binding, allowing easy access for cleaning and pet entry. Finally, reinforce the corners with metal brackets or additional screws to prevent wobbling. This method yields a durable, custom‑sized kennel that can be expanded or modified as your dog grows.
Finishing & Decorating Tips
Once the structural frame is finished, it’s time to add a layer of protection and style. Apply a coat of primer to all exposed wood surfaces; this step seals the grain and provides a smooth base for paint. Choose a pet‑safe, non‑toxic paint such as water‑based acrylic. For a modern look, opt for a neutral color like slate gray or a bold accent like navy blue. Allow the paint to dry for at least 24 hours before proceeding. To add comfort, line the interior with a removable, washable fabric or a padded foam insert. Secure the lining with a rubber band or Velcro strips so it can be removed for cleaning. For extra durability, consider adding a layer of clear polyurethane over the paint; this protects against scratches and moisture. Decorative touches can include a custom nameplate, a small shelf for treats, or a built‑in water bowl. If your dog enjoys lounging, attach a fold‑away cushion or a small hammock made from durable canvas. These finishing touches not only enhance the aesthetic appeal but also improve the kennel’s functionality, making it a welcoming space for your pet.
Safety Checklist
When constructing a dog kennel, safety must be the top priority for both the animal and the owner. First, choose a sturdy frame material—solid hardwood or thick plywood—because lighter woods can flex or break under a dog's weight or when the crate is moved. Measure the dog’s dimensions accurately: height, length, and width, and add at least 2‑3 inches to each dimension to allow for comfortable movement and to prevent the dog from getting its head stuck. Second, use non‑sharp edges and sand all cut surfaces to avoid splinters that could injure the dog or the handler. Third, secure all screws and joints with a high‑strength wood glue and double‑check that each corner is square; a warped frame can collapse or shift, posing a risk during use. Fourth, install a secure latch mechanism that is easy for the owner to operate but difficult for the dog to open. A spring‑loaded latch or a padlock‑style lock works well; avoid simple sliding latches that a curious dog might pry open. Fifth, line the interior with a non‑slip, washable material such as rubber or a thick, durable fabric. This prevents the dog from slipping and makes cleaning easier. Sixth, ensure the crate is well‑ventilated: drill small holes or use a mesh panel on the sides, but keep them small enough to prevent escape. Finally, test the finished crate by placing a weighted object inside to simulate the dog’s weight and check for any wobbling or stress points before the first use. By following these steps, you create a safe, comfortable, and durable kennel that protects your dog and gives you peace of mind.
