Hamster Bin Cage: How to Plan a Safe DIY Enclosure
Plan a hamster bin cage using actual internal dimensions, a secure ventilated lid, deep bedding space and a practical safety checklist.
Hamster Bin Cage: How to Plan a Safe DIY Enclosure
A hamster bin cage is a roomy storage container converted into a secure ventilated habitat. Its potential advantages are affordability, light weight, and solid sides that can contain deep bedding. Its major weaknesses are tapered bases, limited usable floor space in many retail bins, chewable plastic, and unsafe do-it-yourself ventilation cuts. Before buying tools or a storage tub, verify the inside floor footprint, bedding depth, wheel clearance, and a lid plan that cannot be lifted or escaped through. If those requirements cannot be met safely, choose a purpose-built enclosure or suitable tank instead.
What makes a storage bin a suitable hamster home?
A storage tub is not automatically a humane habitat because it looks large on a store shelf. Hamsters require continuous usable floor area, a deep stable burrowing zone, a solid appropriately sized wheel, hides, water, and opportunities to explore. PDSA references at least 100 × 50 cm of floor area and at least 25 cm of bedding as welfare guidance; a bin must be evaluated by its actual internal base and overall height against those needs. Bigger is generally better, and an enclosure cannot be made adequate merely by attaching a tube to a second small box.
A suitable bin also has an effective ventilation design, secure fastenings, and smooth safe edges. Transparent sides may help inspection but can still be scuffed or opaque; those differences matter less than safety and size. Keep in mind that some hamsters aggressively gnaw plastic, in which case a different enclosure material may be appropriate. Bin construction is not a one-size-fits-all recommendation.
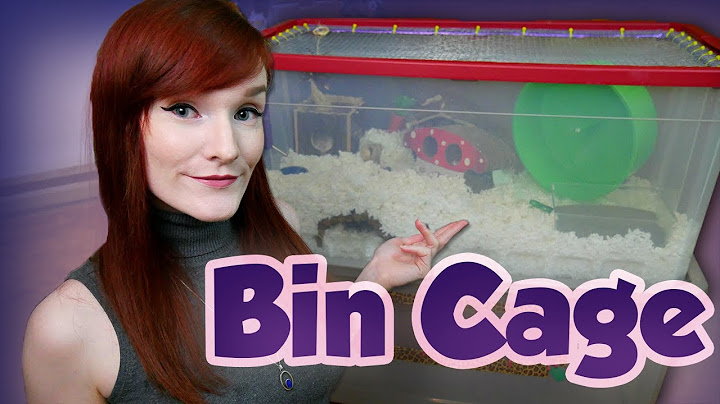
Measure the bottom, not the quart label
Many storage bins taper outward toward the top. The wide dimension printed on packaging may describe the lid rather than the much smaller floor where the hamster actually lives. Measure the interior length and width at bedding level, accounting for rounded corners and molded ribs. Multiply the measurements for a practical footprint estimate, and compare with guidance before choosing a model. A quoted capacity in quarts or liters tells you storage volume, not animal floor area.
For example, a hypothetical bin with 92 cm by 45 cm of usable base has about 4,140 cm² of area; that is below the PDSA reference of 5,000 cm² despite potentially looking substantial from above. This is an example, not a product test. Measure vertical clearance too: the bin must hold deep substrate and still leave safe space for wheel height, hides, and a secure lid. Do not count upper shelves or separate compartments as replacement base area.
Choose plastic for safety and maintenance, not appearance
Look for a rigid, sturdy container that resists deformation when its handles or rim are used. Thin brittle plastic may crack during construction; flexible sides can shift when attached to a lid, creating escape gaps. Avoid sharp internal ribs, damaged hinges, unknown chemical residue, and bins that previously stored hazardous chemicals. A new food-storage label alone does not certify a bin as hamster-proof or chew-proof.
Consider how you will clean and inspect the enclosure. A smooth interior is easier to wipe, and a clear bin makes hidden damp patches more visible. However, heavy wheels or ceramic hides still need stable support, and a lightweight enclosure must sit securely on a level surface. If the hamster persistently gnaws an exposed rim or begins removing plastic fragments, remove the risk and reassess the habitat material rather than repeatedly patching holes with tape.
Plan ventilation before any cutting
Solid-sided bins need deliberate airflow. A broad secure mesh panel in the lid, and in some designs suitable additional ventilation, can provide an air path while keeping the enclosure closed. The exact design depends on container size, room conditions, and how the lid seats, so there is no reliable universal 'drill 20 holes' formula. A handful of tiny holes does not guarantee good ventilation, especially above damp bedding.
Plan panel dimensions, edge protection, and attachment locations on paper first. Check that the mesh openings are appropriate for the hamster's size and that attachment hardware cannot be chewed, loosened, or caught on feet. A ventilated lid must still latch securely. Avoid fabric mesh, loose window screening, exposed staples, adhesive strips used as a primary security method, and sharp wire ends. Condensation or a stale smell is a reason to re-evaluate airflow and cleaning, not to add perfume.
Build safely: all cutting happens away from the animal
Move the hamster to a safe temporary carrier well before starting any power-tool, cutting, or drilling work. Adult builders should use eye and hand protection, stabilize the empty bin, and follow the tool manufacturer's instructions. Do not cut plastic with the hamster inside, and never leave cutting dust or scraps where the animal may ingest them. If the material cracks or the opening warps during construction, stop and assess whether the bin is still structurally suitable.
After creating an opening, smooth every cut edge, eliminate loose plastic burrs, and attach a rigid mesh section so there are no exposed wire ends or reachable sharp screws. Recheck the lid fit when the bin is flexed gently; a panel that looks secure on a tabletop may shift during normal opening. Never rely on packing tape, soft glue, or a few unsecured clips as the only barrier. If you cannot make a reliably ventilated and escape-resistant lid, do not house an animal in the conversion.
Set up bedding, hides, wheel, and heavy accessories
Keep the deep substrate zone continuous enough to support real burrowing rather than reducing the entire floor to a shallow decorative scattering. A bin often needs a high enough wall to retain that depth without pushing bedding against vents or the lid. Position a correctly sized solid wheel on a stable stand; its running surface should allow a straight-back stride and its top must clear the lid. Add a covered hide, multiple routes, drinking access, and a suitable sand bath without blocking essential movement.
If a ceramic hide, sand dish, or wheel is heavy, support it independently of tunnelable bedding so it cannot fall into a burrow. A small optional digging box belongs on a similarly stable surface. Do not solve a lack of floor space by stacking high shelves and ladders. A safe ground-level layout is easier for the hamster to use and makes cleaning and inspection more predictable.
Daily checks: airflow, chewing, escape security
Look for condensation, damp bedding, stale odors, chewed edges, loose fasteners, lid deformation, and any gaps that appear after moving the bin. Check drinking equipment and remove leftover fresh food promptly. Wipe wet or dirty areas and replace the affected substrate while preserving clean familiar nesting material when practical. Strong smells can indicate inadequate spot cleaning or ventilation; a room freshener is not the solution.
Place the bin in a quiet location away from sunlight, hot appliances, drafts, and repeated vibrations. Transparent plastic may heat up in the sun, and a closed plastic lid can severely reduce airflow. Observe activity during the hamster's natural waking hours. Recheck the mesh and closure after every large clean. A bin that was safe when assembled may not remain so after repeated chewing or flexing.
When should you choose a tank or manufactured enclosure?
A DIY bin is a poor choice when the base remains too small, the lid cannot be made secure, ventilation cannot be verified, or the hamster repeatedly chews the enclosure plastic. A suitably sized glass tank with a secure mesh lid may avoid chewable walls, while a well-designed manufactured cage can provide ready-made access and ventilation. Neither is exempt from the same floor-area, bedding, wheel, and cleaning checks.
A retail bin can also be unsuitable because its lid is too low once 25 cm of substrate and a large wheel are accommodated. If the geometry forces every essential feature into a cramped corner, start with a different container instead of sacrificing enrichment. The safest DIY project is one that can be confidently measured, built without exposed hazards, cleaned reliably, and used by the hamster without persistent escape or chewing problems.
DIY bin cage preflight
| Check | What to verify | Reject or redesign if |
| Interior base | Continuous length × width at floor | Only top-rim dimensions look spacious |
| Wall and lid clearance | Deep bedding plus wheel space | Lid presses on equipment or bedding |
| Ventilation | Large secured mesh opening, air exchange | Tiny holes or condensation persist |
| Edge safety | Cut plastic and mesh fully smoothed | Sharp burrs, exposed fasteners or wires |
| Security | Secure clips, stable rim, no chew gaps | Lid flexes open or plastic is being eaten |
Practical checklist before changing the setup
• Measure usable inside base, not retail quarts or lid width.
• Plan deep bedding and wheel clearance before cutting.
• Make mesh openings and attachments secure and smooth.
• Keep cutting dust, tools and sharp wire away from the animal.
• Recheck plastic chewing, airflow and lid integrity routinely.
Frequently asked questions
Are bin cages safe for hamsters?
Some carefully built bins can work, but only when measured floor area, deep bedding, adequate ventilation, smooth cut edges, lid security, and plastic chewing are all addressed.
How many quarts should a hamster bin cage be?
No quart count guarantees suitable floor space. Measure internal base length and width and compare the usable footprint with welfare guidance.
Can I just drill holes in the lid?
A few small holes cannot be assumed to provide adequate airflow. A well-secured mesh ventilation design is generally more appropriate, with no exposed sharp edges.
Can a hamster chew out of a plastic bin?
Some hamsters can damage plastic, especially at corners, vents, and protruding edges. Inspect daily and change enclosure type if the animal is removing or swallowing pieces.
Does a DIY bin cage replace a playpen?
A properly designed bin is permanent housing; a supervised playpen is optional separate enrichment. Neither substitutes for the other or for deep burrowing substrate.
The bottom line
A good bin cage begins with measured interior space, not an attractive storage capacity label. Build a secure ventilated lid away from the animal, protect every cut edge, allow deep bedding and wheel clearance, and keep monitoring plastic damage. If the design cannot meet those tests, select safer housing.
Related hamster guides
Hamster Cage · Hamster Tank · Hamster Bedding · Hamster Digging Box