How to Edit a Video Online for Free
Trim and arrange a short video in a browser, add captions and audio, check watermark limits, and export an AI-generated clip.
How to Edit a Video Online for Free
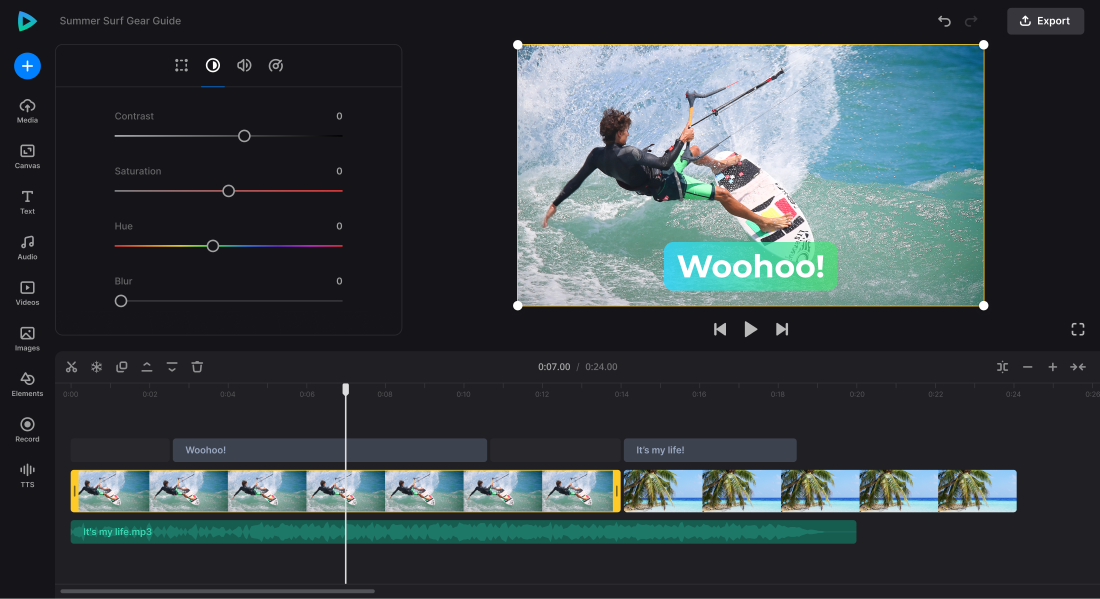
Editing a video online for free is a practical way to turn rough clips into a short, understandable result without installing a full desktop program. The workflow is the same whether the source came from a camera or an AI generator: import, arrange, trim, caption and verify the export. The important caveats are upload privacy and limits that may appear only at the end.
Choose a browser editor and check upload limits
Choose a browser editor that can accept your file types and export the size you need. Before uploading private or client video, read its current handling and retention terms. Check maximum file size, free storage, account requirements and watermark policy. A simple test with a harmless five-second clip can reveal limits without exposing sensitive footage. Avoid putting confidential meeting recordings or other people's personal material into an unfamiliar editor. If your current device is offline or the files are extremely large, a desktop application may be the better tool from the start.
Import your clips and set the aspect ratio
Create a project with a deliberate canvas. For a short vertical post, 9:16 is a common starting point; for a conventional widescreen video, use 16:9. Import all the approved clips and give each a descriptive filename so similar AI variations are not confused. Add them to the timeline in story order, not merely download order. If a horizontal source needs a vertical crop, keep faces, hands and product details within the safe region. Do not stretch an image to fill a mismatched frame; use reframing or a simple background treatment instead.
Trim unnecessary moments and arrange scenes
Trim the first and last frames of each clip where a hand enters awkwardly or AI motion visibly settles. Place the strongest opening action first, and cut out scenes that repeat the same information. A clean jump cut can be better than a flashy transition. Check continuity of direction: if a bicycle exits right and suddenly enters from the opposite side, the motion may feel reversed. Watch the sequence without music to test the story before sound hides pacing problems. Keep each scene only as long as viewers need to understand its action or read the words.
Add legible captions and permitted audio
Write captions from the approved narration and proofread names, prices and instructions manually. Make the type large enough for a phone and avoid placing it directly at the top or bottom edges where platform controls may overlap. Add music only when its license permits your use, and reduce the music level whenever someone speaks. Browser editors may offer automatic captions, but automatic transcription can miss proper nouns or mangle numbers. Review captions against the actual audio, line by line. Avoid making important meaning depend on sound alone for viewers watching muted video.
Check watermarks, exports and privacy
Before export, look for free-tier restrictions: resolution caps, watermarks, storage limits or effects that silently require a subscription. Recheck the privacy setting of the project and whether sharing a preview makes it public to other people. If the editor requires permission to reuse your content for training or promotional examples, read the exact policy and decide whether it fits your material. Watch a full-screen preview before finalizing, but do not assume that the preview and actual downloaded file will have the same quality or crop.
Save and verify your final clip
Download the result and open it outside the editor. Check the first and final frames, aspect ratio, audio channel balance, subtitles and playback on a phone. If the file has a watermark you did not expect, return to the project and remove any paid-only element or choose an alternative editor rather than cropping out an unauthorized mark. Save a clean version of the project when supported. Keep the source media as well as the finished MP4, because browser services can change storage rules and you may later need to rebuild an edit.
When to switch to a desktop editor
Switch to a desktop editor if upload privacy is unsuitable, the footage is too large, precise multi-track editing is difficult or free exports do not meet your needs. Do not spend hours forcing a browser workflow to solve a problem it cannot handle. If you need only one still image from a video, use a frame extractor; if your question is which free editor to choose, use the separate comparison criteria. This page is about the actual browser editing steps, not a ranking of every product with an online video editor.
A practical example to adapt
Practice edit: import three six-second clips you own. Trim each to four seconds, add one opening caption, put a soft licensed sound bed under the sequence and export a 12-second vertical MP4. View it in a phone player and check that the first frame, captions and final audio fade behave as expected.
Frequently asked questions
Can I edit a video online without installing software?
Yes, using a browser editor that accepts your files, though uploading and free-tier limits apply.
Why is my online export watermarked?
A free plan or an effect/template may require a paid tier; inspect the current export terms.
Should I upload private client footage to any free editor?
No. Check permissions, retention and sharing rules, and use a local tool when confidentiality requires it.
Related guides
free video editing software comparison checklist
editing an AI video montage on iPhone